我当时学习开发 Chrome 插件的时候,还不会 Vue,更别说 Webpack 了,所以使用的都是原生的 html 开发,效率就不提了,而这次就准备使用 vue-cli 来进行编写一个某 B 站获取视频信息,评论的功能(原本是打算做自动回复的),顺便巩固下 chrome 开发(快一年没碰脚本类相关技术了),顺便写套模板供自己后续编写 Chrome 插件做铺垫。
环境搭建
Vue Web-Extension - A Web-Extension preset for VueJS (vue-web-extension.netlify.app)
npm install -g @vue/cli
npm install -g @vue/cli-init
vue create --preset kocal/vue-web-extension my-extension
cd my-extension
npm run server
会提供几个选项,如 Eslint,background.js,tab 页,axios,如下图
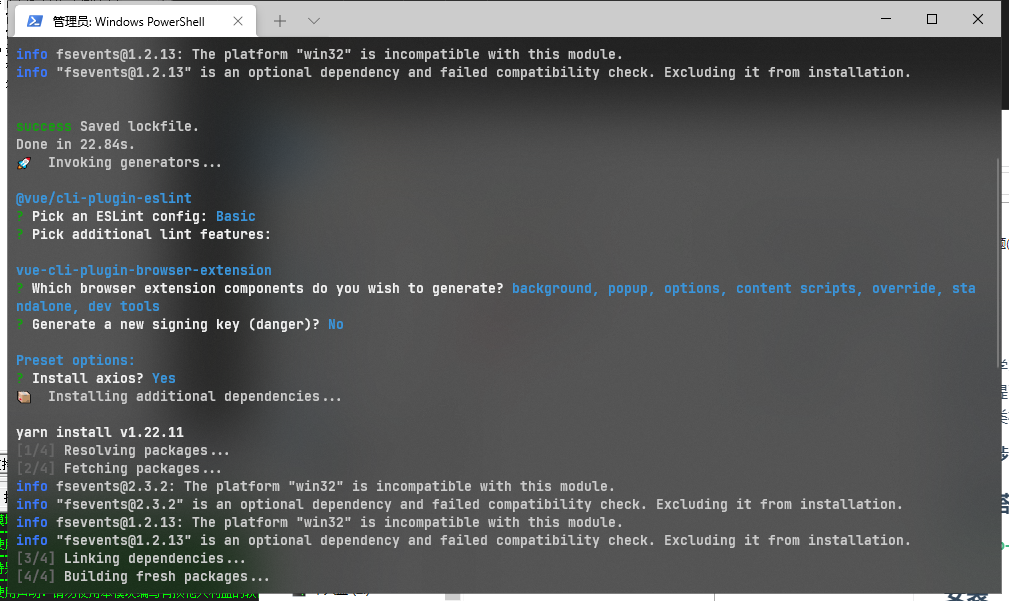
选择完后,将会自动下载依赖,通过 npm run server 将会在根目录生成 dist 文件夹,将该文件拖至 Chrome 插件管理便可安装,由于使用了 webpack,所以更改代码将会热更新,不用反复的编译导入。
项目结构
├─src
|  ├─App.vue
|  ├─background.js
|  ├─main.js
|  ├─manifest.json
|  ├─views
|  |   ├─About.vue
|  |   └Home.vue
|  ├─store
|  |   └index.js
|  ├─standalone
|  |     ├─App.vue
|  |     └main.js
|  ├─router
|  |   └index.js
|  ├─popup
|  |   ├─App.vue
|  |   └main.js
|  ├─override
|  |    ├─App.vue
|  |    └main.js
|  ├─options
|  |    ├─App.vue
|  |    └main.js
|  ├─devtools
|  |    ├─App.vue
|  |    └main.js
|  ├─content-scripts
|  |        └content-script.js
|  ├─components
|  |     └HelloWorld.vue
|  ├─assets
|  |   └logo.png
├─public
├─.browserslistrc
├─.eslintrc.js
├─.gitignore
├─babel.config.js
├─package.json
├─vue.config.js
├─yarn.lock
根据所选的页面,并在 src 与 vue.config.js 中配置页面信息编译后 dist 目录结构如下
├─devtools.html
├─favicon.ico
├─index.html
├─manifest.json
├─options.html
├─override.html
├─popup.html
├─_locales
├─js
├─icons
├─css
安装组件库
安装 elementUI
整体的开发和 vue2 开发基本上没太大的区别,不过既然是用 vue 来开发的话,那肯�定少不了组件库了。
要导入 Element-ui 也十分简单,Vue.use(ElementUI); Vue2 中怎么导入 element,便怎么导入。演示如下
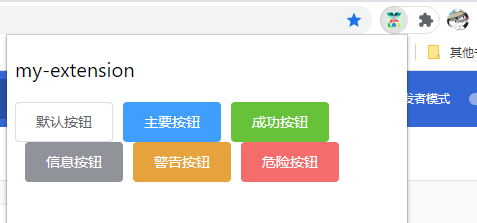
不过我没有使用 babel-plugin-component 来按需引入,按需引入一个按钮打包后大约 1.6m,而全量引入则是 5.5 左右。至于为什么不用,因为我需要在 content-scripts.js 中引入 element 组件,如果使用 babel-plugin-component 将无法按需导入组件以及样式(应该是只支持 vue 文件按需引入,总之就是折腾了我一个晚上的时间)
安装 tailwindcss
不过官方提供了如何使用 TailwindCSS,这里就演示一下
在 Vue 3 和 Vite 安装 Tailwind CSS - Tailwind CSS 中文文档
推荐安装低版本,最新版有兼容性问题
npm install tailwindcss@npm:@tailwindcss/postcss7-compat postcss@^7 autoprefixer@^9
创建 postcss.config.js 文件
// postcss.config.js
module.exports = {
  plugins: [
    // ...
    require('tailwindcss'),
    require('autoprefixer'), // if you have installed `autoprefixer`
    // ...
  ],
}
创建 tailwind.config.js 文件
// tailwind.config.js
module.exports = {
  purge: {
    // Specify the paths to all of the template files in your project
    content: ['src/**/*.vue'],

    // Whitelist selectors by using regular expression
    whitelistPatterns: [
      /-(leave|enter|appear)(|-(to|from|active))$/, // transitions
      /data-v-.*/, // scoped css
    ],
  },
  // ...
}
在 src/popup/App.vue 中导入样式,或在新建 style.css 在 mian.js 中import "../style.css";
<style>
/* purgecss start ignore */
@tailwind base;
@tailwind components;
/* purgecss end ignore */

@tailwind utilities;
</style>
从官方例子导入一个登陆表单,效果如下

项目搭建
页面搭建
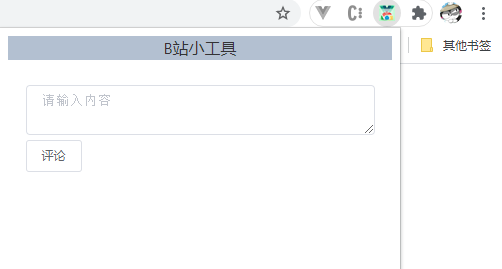
页面搭建就没什么好说的了,因为使用的是 element-ui,所以页面很快就搭建完毕了,效果如图
悬浮窗
悬浮窗其实可有可无,不过之前写 Chrome 插件的时候就写了悬浮窗,所以 vue 版的也顺带写一份。
要注意的是悬浮窗是内嵌到网页的(且在 document 加载前载入,也就是"run_at": "document_start"�),所以需要通过 content-scripts.js 才能操作页面 Dom 元素,首先在配置清单 manifest.json 与 vue.confing.js 中匹配要添加的网站,以及注入的 js 代码,如下
  "content_scripts": [
    {
      "matches": ["https://www.bilibili.com/video/*"],
      "js": ["js/jquery.js", "js/content-script.js"],
      "css": ["css/index.css"],
      "run_at": "document_start"
    },
    {
      "matches": ["https://www.bilibili.com/video/*"],
      "js": ["js/jquery.js", "js/bilibili.js"],
      "run_at": "document_end"
    }
  ]
	contentScripts: {
          entries: {
            'content-script': ['src/content-scripts/content-script.js'],
            bilibili: ['src/content-scripts/bilibili.js'],
          },
        },
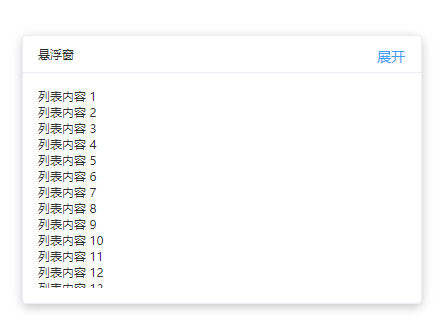
由于是用 Vue,但又要在 js 中生成组件,就使用document.createElement来进行创建元素,Vue 组件如下(可拖拽)
如果使用babel-plugin-component按需引入,组件的样式将无法载入,同时自定义组件如果编写了 style 标签,那么也同样无法载入,报错:Cannot read properties of undefined (reading 'appendChild')
大致就是 css-loader 无法加载对应的 css 代码,如果执意要写 css 的话,直接在 manifest.json 中注入 css 即可
完整代码
// 注意,这里引入的vue是运行时的模块,因为content是插入到目标页面,对组件的渲染需要运行时的vue, 而不是编译环境的vue (我也不知道我在说啥,反正大概意思就是这样)
import Vue from 'vue/dist/vue.esm.js'
import ElementUI, { Message } from 'element-ui'
Vue.use(ElementUI)

// 注意,必须设置了run_at=document_start此段代码才会生效
document.addEventListener('DOMContentLoaded', function () {
  console.log('vue-chrome扩展已载入')

  insertFloat()
})

// 在target页面中新建一个带有id的dom元素,将vue对象挂载到这个dom上。
function insertFloat() {
  let element = document.createElement('div')
  let attr = document.createAttribute('id')
  attr.value = 'appPlugin'
  element.setAttributeNode(attr)
  document.getElementsByTagName('body')[0].appendChild(element)

  let link = document.createElement('link')
  let linkAttr = document.createAttribute('rel')
  linkAttr.value = 'stylesheet'
  let linkHref = document.createAttribute('href')
  linkHref.value = 'https://unpkg.com/element-ui/lib/theme-chalk/index.css'
  link.setAttributeNode(linkAttr)
  link.setAttributeNode(linkHref)
  document.getElementsByTagName('head')[0].appendChild(link)

  let left = 0
  let top = 0
  let mx = 0
  let my = 0
  let onDrag = false

  var drag = {
    inserted: function (el) {
      ;(el.onmousedown = function (e) {
        left = el.offsetLeft
        top = el.offsetTop
        mx = e.clientX
        my = e.clientY
        if (my - top > 40) return

        onDrag = true
      }),
        (window.onmousemove = function (e) {
          if (onDrag) {
            let nx = e.clientX - mx + left
            let ny = e.clientY - my + top
            let width = el.clientWidth
            let height = el.clientHeight
            let bodyWidth = window.document.body.clientWidth
            let bodyHeight = window.document.body.clientHeight

            if (nx < 0) nx = 0
            if (ny < 0) ny = 0

            if (ny > bodyHeight - height && bodyHeight - height > 0) {
              ny = bodyHeight - height
            }

            if (nx > bodyWidth - width) {
              nx = bodyWidth - width
            }

            el.style.left = nx + 'px'
            el.style.top = ny + 'px'
          }
        }),
        (el.onmouseup = function (e) {
          if (onDrag) {
            onDrag = false
          }
        })
    },
  }

  window.kz_vm = new Vue({
    el: '#appPlugin',
    directives: {
      drag: drag,
    },
    template: `
      <div class="float-page" ref="float" v-drag>
        <el-card class="box-card" :body-style="{ padding: '15px' }">
          <div slot="header" class="clearfix" style="cursor: move">
            <span>悬浮窗</span>
            <el-button style="float: right; padding: 3px 0" type="text" @click="toggle">{{ show ? '收起' : '展开'}}</el-button>
          </div>
          <transition name="ul">
            <div v-if="show" class="ul-box">
              <span> {{user}} </span>
            </div>
          </transition>
        </el-card>
      </div>
      `,
    data: function () {
      return {
        show: true,
        list: [],
        user: {
          username: '',
          follow: 0,
          title: '',
          view: 0,
        },
      }
    },
    mounted() {},
    methods: {
      toggle() {
        this.show = !this.show
      },
    },
  })
}
因为只能在 js 中编写 vue 组件,所以得用 template 模板,同时使用了 directives,给组件添加了拖拽的功能(尤其是window.onmousemove,如果是元素绑定他自身的鼠标移动事件,那么拖拽鼠标将会十分卡顿),还使用了 transition 来进行缓慢动画效果其中注入的 css 代码如下
.float-page {
  width: 400px;
  border-radius: 8px;
  position: fixed;
  left: 50%;
  top: 25%;
  z-index: 1000001;
}

.el-card__header {
  padding: 10px 15px !important;
}

.ul-box {
  height: 200px;
  overflow: hidden;
}

.ul-enter-active,
.ul-leave-active {
  transition: all 0.5s;
}
.ul-enter,
.ul-leave-to {
  height: 0;
}
相关逻辑可自行观看,这里不在赘述了,并不复杂。
也顺带是复习一下 HTML 中鼠标事件和 vue 自定义命令了
功能实现
主要功能
-
检测视频页面,输出对应 up 主,关注数以及视频标题播放(参数过多就不一一显示了)
-
监控关键词根据内容判断是否点赞,例如文本出现了下次一定,那么就点赞。
输出相关信息
这个其实只要接触过一丢丢爬虫的肯定都会知道如何实现,通过右键审查元素,像这样
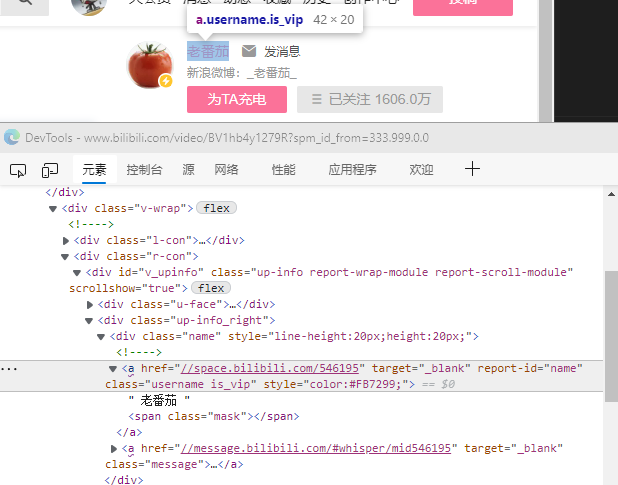
然后使用 dom 操作,选择对应的元素,输出便可
> document.querySelector("#v_upinfo > div.up-info_right > div.name > a.username").innerText
< '老番茄'
当然使用 JQuery 效果也是一样的。后续我都会使用 JQuery 来进行操作
在 src/content-script/bilibili.js 中写下如下代码
window.onload = function () {
  console.log('加载完毕')

  function getInfo() {
    let username = $('#v_upinfo > div.up-info_right > div.name > a.username').text()
    let follow = $(
      `#v_upinfo > div.up-info_right > div.btn-panel > div.default-btn.follow-btn.btn-transition.b-gz.following > span > span > span`,
    ).text()
    let title = $(`#viewbox_report > h1 > span`).text()
    let view = $('#viewbox_report > div > span.view').attr('title')

    console.log(username, follow, title, view)
  }

  getInfo()
}
重新加载插件,然后输出查看结果
加载完毕
bilibili.js:19 老番茄 1606.0万 顶级画质 总播放数2368406
这些数据肯定单纯的输出肯定是没什么作用的,要能显示到内嵌悬浮窗口,或者是 popup 页面上(甚至发送 ajax 请求到远程服务器上保存)
对上面代码微改一下
window.onload = function () {
  console.log('加载完毕')

  function getInfo() {
    let username = $('#v_upinfo > div.up-info_right > div.name > a.username').text().trim()
    let follow = $(
      `#v_upinfo > div.up-info_right > div.btn-panel > div.default-btn.follow-btn.btn-transition.b-gz.following > span > span > span`,
    ).text()
    let title = $(`#viewbox_report > h1 > span`).text()
    let view = $('#viewbox_report > div > span.view').attr('title')

    //console.log(username, follow, title, view);
    window.kz_vm.user = {
      username,
      follow,
      title,
      view,
    }
  }
  getInfo()
}
其中window.kz_vm是通过window.kz_vm = new Vue() 初始化的,方便我们操作 vm 对象,就需要通过 jquery 选择元素在添加属性了。如果你想的话也可以直接在 content-script.js 上编写代码,这样就无需使用 window 对象,但这样导致一些业务逻辑都堆在一个文件里,所以我习惯分成 bilibili.js 然后注入方式为 document_end,然后在操作 dom 元素吗,实现效果如下
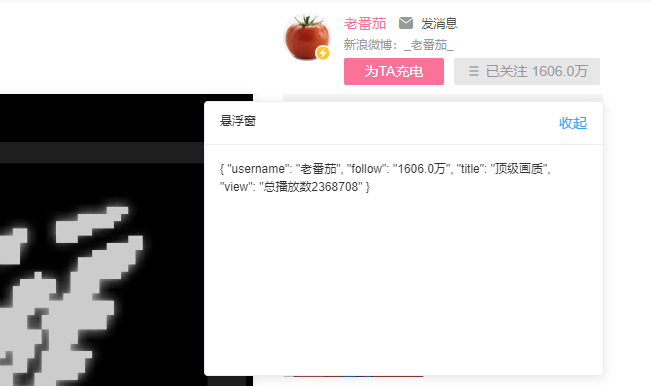
如果像显示到 popup 页面只需要通过页面通信就行了,不过前提得先 popup 打开才行,所以一般都是通过 background 来进行中转,一般来说很少 content –> popup(因为操作 popup 的前提都是 popup 要打开),相对更多的是 content –> background 或 popup –> content
content-script 主动发消息给后台 我是小茗同学 - 博客园 (cnblogs.com)
实现评论
这边简单编写了一下页面,通过 popup 给 content,让 content 输入评论内容,与点击发送,先看效果
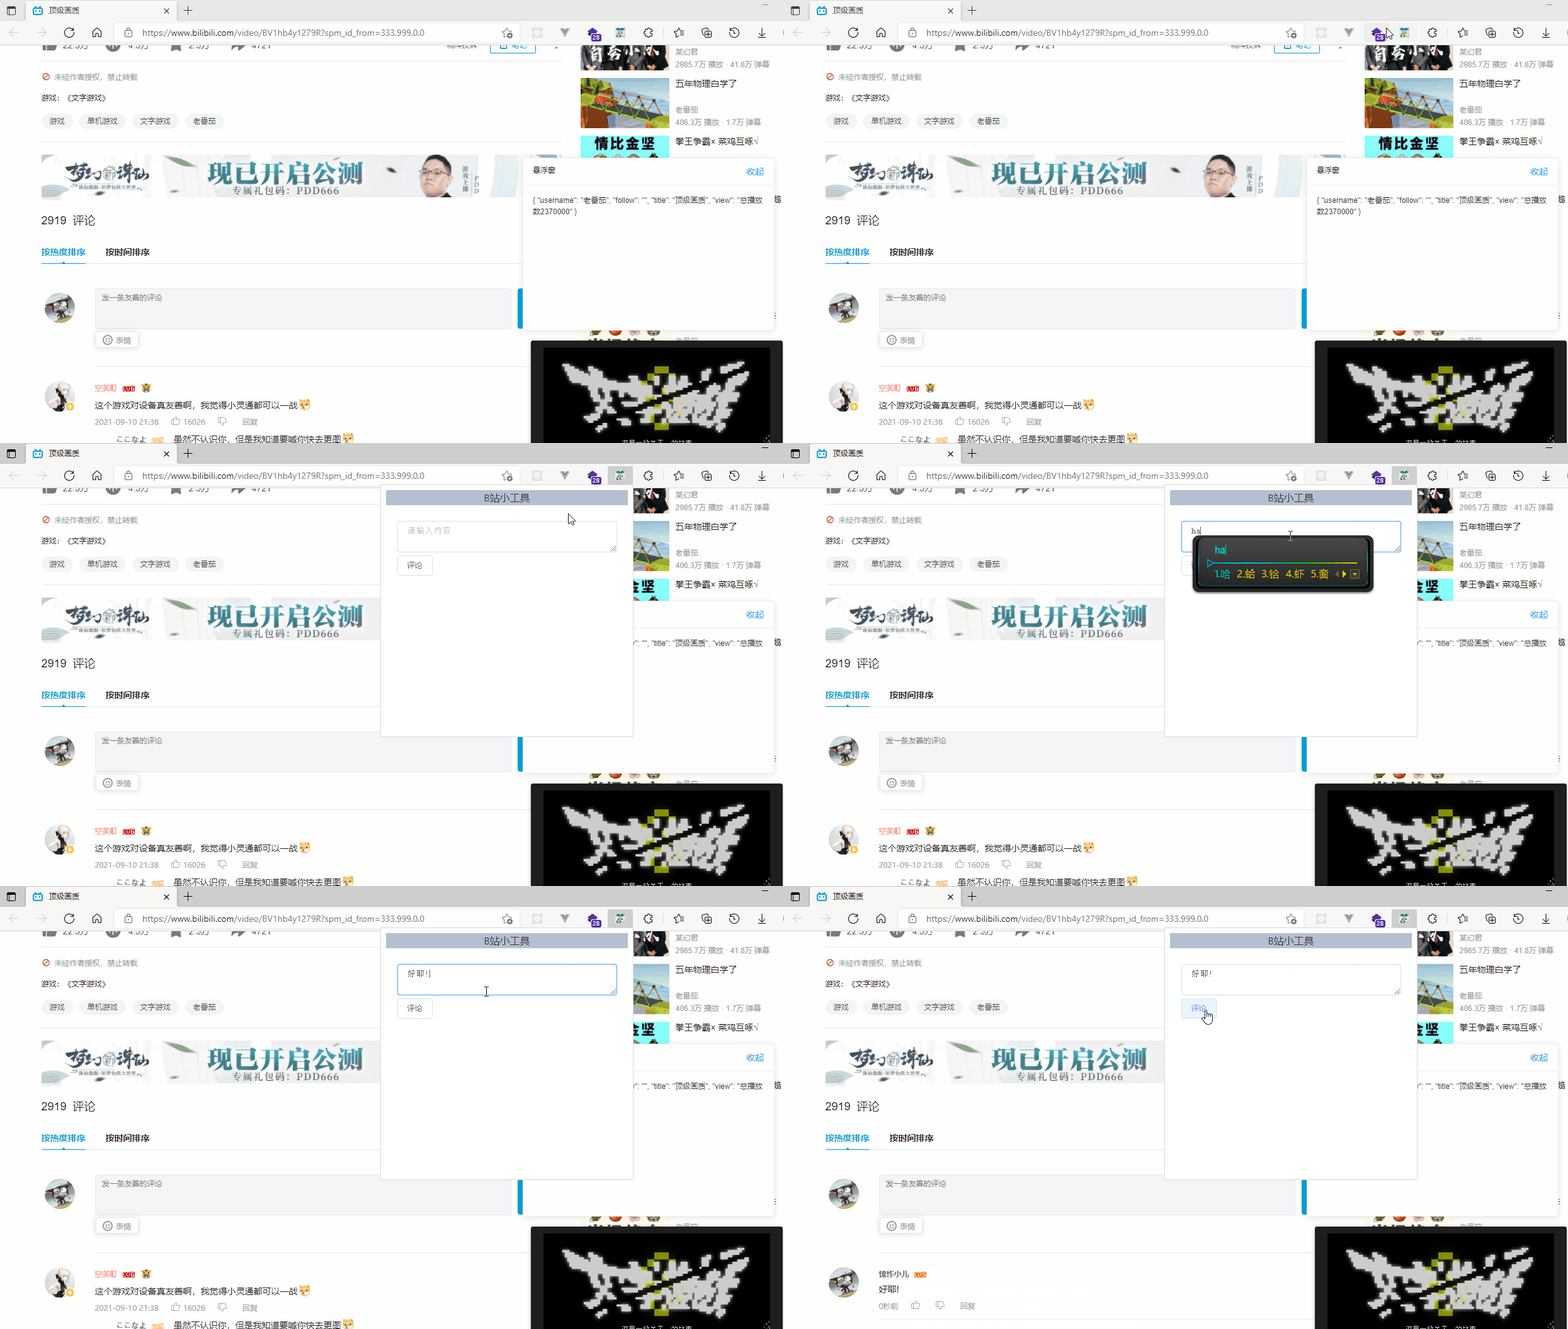
同样的,找到对应元素位置
// 评论文本框
$('#comment > div > div.comment > div > div.comment-send > div.textarea-container > textarea').val(
  '要回复的内容',
)
// 评论按钮
$('#comment > div > div.comment > div > div.comment-send > div.textarea-container > button').click()
接着就是写页面通信的了,可以看到是 popup 向 content 发送请求
window.onload = function () {
  console.log('content加载完毕')

  function comment() {
    chrome.runtime.onMessage.addListener(function (request, sender, sendResponse) {
      let { cmd, message } = request
      if (cmd === 'addComment') {
        $(
          '#comment > div > div.comment > div > div.comment-send > div.textarea-container > textarea',
        ).val(message)
        $(
          '#comment > div > div.comment > div > div.comment-send > div.textarea-container > button',
        ).click()
      }

      sendResponse('我收到了你的消息!')
    })
  }

  comment()
}
<template>
<div>
<el-container>
<el-header height="24">B站小工具</el-header>
<el-main>
<el-row :gutter="5">
<el-input
type="textarea"
:rows="2"
placeholder="请输入内容"
v-model="message"
class="mb-5"
>
</el-input>
<div>
<el-button @click="addComment">评论</el-button>
</div>
</el-row>
</el-main>
</el-container>
</div>
</template>
<script>
export default {
name: 'App',
data() {
return {
message: '',
list: [],
open: false,
}
},
created() {
chrome.storage.sync.get('list', obj => {
this.list = obj['list']
})
},
mounted() {
chrome.runtime.onMessage.addListener(function (request, sender, sendResponse) {
console.log('收到来自content-script的消息:')
console.log(request, sender, sendResponse)
sendResponse('我是后台,我已收到你的消息:' + JSON.stringify(request))
})
},
methods: {
sendMessageToContentScript(message, callback) {
chrome.tabs.query({ active: true, currentWindow: true }, function (tabs) {
chrome.tabs.sendMessage(tabs[0].id, message, function (response) {
if (callback) callback(response)
})
})
},
addComment() {
this.sendMessageToContentScript({ cmd: 'addComment', message: this.message }, function () {
console.log('来自content��的回复:' + response)
})
},
},
}
</script>
代码就不解读了,调用 sendMessageToContentScript 方法即可。相关源码可自行下载查看
实现类似点赞功能也是同理的。
相关模板
整体体验
当时写 Chrome 插件的效率不能说慢,反正不快就是了,像一些 tips,都得自行封装。用过 Vue 的都知道写网页很方便,写 Chrome 插件未尝不是编写一个网页,当时的我在接触了 Vue 后就萌发了使用 vue 来编写 Chrome 的想法,当然肯定不止我一个这么想过,所以我在 github 上就能搜索到相应的源码,于是就有了这篇文章。
如果有涉及到爬取数据相关的,我肯定是首选使用 HTTP 协议,如果在搞不定我会选择使用 puppeteerjs,不过 Chrome 插件主要还是增强页面功能的,可以实现原本页面不具备的功能。
本文仅仅只是初步体验,简单编写了个小项目,后期有可能会实现一个百度网盘一键填写提取码,Js 自吐 Hooke 相关的。(原本是打算做 pdd 商家自动回复的,客户说要用客户端而不是网页端(客户端可以多号登陆),无奈,这篇博客就拿 B 站来演示了)